
How To Professionally Regrout A Tile Shower

Tile and Grout Regrouting Tips
By Troy Cantini
When areas of shower grout look moldy, yellow and discolored then this is an indication that the rest of the grout is also in poor condition. The damaged grout may not look too bad from the outside but what you are not seeing behind the tiles in the walls can be a dangerous situation.

Over time water will make its way through the weakened grout and start accumulating in your walls. Eventually mold and mildew can grow in your walls and then can start eating into your wall joists and can cause serious problems. Additionally the moldy walls can attract ants and termites into your home.
The best way to prevent your shower from failing and causing excess damage to your home is to regrout your shower. Regrouting a tile shower is a difficult task but can be done by many industrious DIY homeowners. You should only attempt to regrout a shower with narrow grout lines that have unsanded grout in them. You can read here about the differences between sanded vs unsanded grout. If you have sanded grout then you may want to consider cleaning the dirty grout and then colorsealing the shower grout to restore your grout back to like new condition.

The first thing that needs to be done when regrouting a shower is to remove all of the old dirty and moldy grout and caulk. Removing the old caulk can be done with a plain old razor blade scraper tool. For extremely hard to remove caulk some acetone can be used to help soften the caulk up and remove it.
After you have removed all the old caulk then it is time to remove the old grout. There are many ways to remove grout but the best way is with a Fein multimaster tool or other type of oscillating tool using a diamond bit grout removal blade. If you are going to be regrouting showers for a business the Fein Supercut is a much more powerful tool made for the serious home improvement contractor. If you are just a DIY homeowner then the Fein multimaster tool will work just fine.
The grout should be dug out at least 1/8th of an inch deep so that new grout can have a firm base to adhere to. Do not attempt to just apply new grout over the damaged existing grout. Just applying new grout over the existing grout is called skim coating grout and this is a very bad practice. The new grout will not properly adhere to the old grout and there will not be a sufficient depth for the new grout to adhere to. Over time the new grout will start flaking and chipping away. Also the shower walls will still have mold in them and you will not be solving any of your moldy wall issues with this type of skim coating procedure.
Ensure that you hold the Oscillating tool steady and move it in a steady up and down motion along the grout lines. Use a steady hand to hold the tool so that the diamond blade goes in an up and down or side to side direction. You should hold the tool with two hands for better control so you do not slip out of the grout lines. Let the oscillating tool do the work and try not to put much pressure on the grout line. Let the tool do most of the work for you.
It is best to use the a round diamond bit for removing most of the grout in the shower. Do not attempt to use any carbide or off brand bit to remove the old grout. These bits will not last very long at all and they also will not grind away the grout easily like the diamond bits can.
For removing the grout along the corners and in tight spots a sickle or segmented diamond bit can be used. The sickle and segmented diamond bits allow you to remove grout out to the edges of adjacent tiles without damaging the adjacent tiles. The segmented diamond bits are good in that they can remove large areas of grout in the middle of the shower and also allow you to remove grout in the corners and in tight spots.
It is a good idea to allow you shower to dry out for a few days to ensure that your shower walls are dry before applying the new grout. A fan or dehumidifier can be used to assist in drying out your shower. If you try to apply grout to a wet shower wall the grout will not set properly and can look yellow or discolored in the grout lines. Also by drying out your shower wall you will be killing all the mold and mildew in the shower walls while the grout has been removed.
Use only dry powdered cement based grout for your new grout. Mix the grout to a peanut butter consistency. You should be able to be able to grab the grout out of the bucket without having it ooze out between your fingers. Follow the manufactures instructions when mixing the grout and it is very important to not have too much water mixed in with the grout. Watery grout will not set properly and will be weak soft grout that will not last for a long period of time.
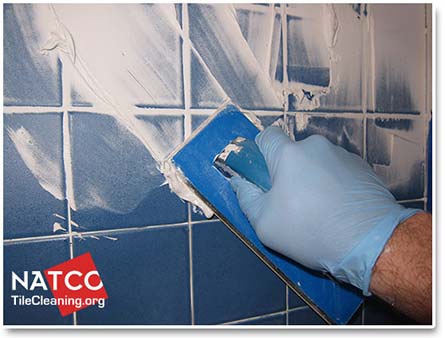
Apply the grout with a rubber float and force the grout deep into all of the grout lines. Forcing the grout deep into the grout lines will ensure that there is good coverage of grout in all of the grout lines. Only apply grout to one small wall at a time. You do not want the grout to dry hard before you clean it with a sponge. For larger walls you may have to apply the grout to only one half of a wall at a time.
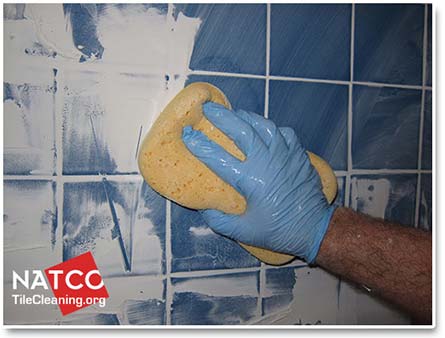
After you have applied the grout to one section of the shower then wipe the tiles clean with a sponge. Using a damp sponge only wipe a small area before rinsing out your sponge in your bucket of water.
After you have wiped an area clean and the grout lines look straight and even then do not go back and re wipe the area with the sponge. Using too much water will weaken the grout and can also take the color out of colored grout. Just keep moving on until the whole area is cleaned and the grout lines look straight and even. You will see a grout haze form and you will need to go back later to clean up the grout haze on the tiles.
After you have cleaned up all the shower tiles then go and clean up the grout haze from the tile surfaces. Use a paper towel or cheese cloth to wipe away the grout haze. Do not leave the grout haze sit overnight because it can be extremely difficult to remove. Usually by the time you are done cleaning the excess grout with the sponge and have allowed the grout to sit for 30 minutes then you can start to remove the grout haze off the tile surfaces. Also at this time you can also inspect all the grout lines to ensure that you have not missed any spots and the grouting job was done correctly. If necessary apply small bits of grout to any areas of grout that were missed when applying the grout.

You should allow the grout to dry for at least 48 hours before you seal the grout and caulk the shower. It is best to seal the grout before applying the caulk in the shower. This will ensure that all of the grout gets sealed and the sealant does not damage the caulk. You should use only 100% silicone caulking like Laticrete Latasil Caulk or GE silicone II sold in home improvement stores. 100% silcone caulk will not allow mold and mildew to grow in it and will last for a longer period of time than any type of siliconized caulks. You can read more about how to recaulk a shower here.
After you have recaulked you shower then you should allow at least an additional 24 hours for the new caulk to cure before using the shower. You will be surprised at how much better you shower will look after you have properly regrouted your tile shower.
NATCO Related Articles>
 How To Clean Ceramic Tiles
Ceramic tiles are typically easy to clean but the grout between the tiles is usually much more difficult to clean.
Read more»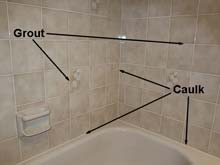 Grout Vs Caulk In Shower
Properly installed tile showers require both grout and caulk to be installed.
Read more»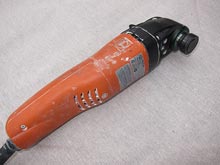 Fein Supercut Review
The Fein Supercut is the top or the line multimaster type of oscillating tool manufactured by Fein.
Read more»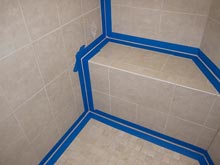 How To Re-Caulk Tile Shower
Caulk is the last line of defense to prevent water from getting from getting into your walls in a tile shower.
Read more»